Befreiungskriege 1813-14

Painting and modelling 28mm Napoleonic wargaming miniatures

Posts Tagged ‘General de Brigade’

Under the sign of the Black Swan

Posted by Martin on October 21, 2008

Poles and Austrians clash at Leipzig game

Poles and Austrians clash at Leipzig game

AKA The Black Swan Hotel is where the stalwarts of the Devizes and District Wargames Group met for one of their occasional two-day games this past weekend. On this occasion, it was a massive attempt at the Leipzig scenario from one of the General de Brigade scenario books.

Now, I’m not a member of the club (frankly, I’m not very good at being a member of any club) but I do sort-of know one of two of the members, notably Glen who sometimes graces BfK with a comment, so I invited myself along for an hour or two on the Sunday to observe the action and have a chat with the players and umpires.

What I saw was really enjoyable and heartening: a friendly group playing a 28mm Napoleonic “big battalions” game on an epic scale. Best of all, several articulate young people (i.e. not 40-something dads like me) clearly having a great time. Check out Glen’s game report on the General de Brigade forum for a flavour of the event and more pictures.

My thanks to all present for their hospitality. I’ve now got an open invitation to come along to the next one and maybe even take up a divisional command. And, you know what, I’m actually rather tempted.

Posted in Clubs and Shows | Tagged: , | Leave a Comment »

Casualty markers SBS: the final result

Posted by Martin on May 31, 2008

front viewrear view

I thought I’d start here by dealing with the question several people have asked: how are you planning to use these casualty markers? I think the best way to explain is to quote what David Brown wrote in the General de Brigade ruleset:

top view“For my games I use a collection of ‘dead and wounded’ figures mounted on 25mm square card as Casualty Markers. Half of the markers are numbered 1234 around the four sides, the other half 4567 around the sides. The marker is then placed next to a unit once it takes casualties, with the appropriate casualty marker number actually in physical contact with the unit. As casualties mount the marker is turned round to show the current casualty state. Once the casualties reach the number of figures on a base, a base is removed.”

Now I’ve slightly adapted this idea – I’ve gone for a larger 40mm base (DB usually games with 15mm miniatures) and I’ve used octagons instead to reduce the number of casualty markers I’ll need to make.

So, how does a finished casualty marker look? To answer that, here’s the one I’ve made to go with the second battalion of the Kurmark landwehr infantry regiment I’m painting up at present. The idea is that I’ll eventually give each unit I paint its own distinctive casualty marker.

Posted in Casualty Markers, Landwehr Infantry, On the Workbench, Paint and Equipment | Tagged: , , , , , , | 8 Comments »

Casualty markers SBS: part two

Posted by Martin on May 29, 2008

In part one we reached the point where the overlay had been glued to the base. Now that this has dried out properly, we can move on.

STEP 5: Varnishing
We want to protect the overlay from the rigours of handling during wargaming in just the same way that the paint jobs on figures need to be protected. So it should come as no surprise that I used the same varnishing approach for this overlay as I use for figures. The first coat of varnish is a polyeurethene gloss for protection and the second coat is a matt acrylic for appearance.

For the gloss varish I use Humbrol clear enamel 35 (which seems to go under a variety of names these days). The important thing to remember is that the varnish needs to be thoroughly shaken and stirred before use. I always keep a seperate brush exclusively for gloss varnishing and I clean it using Humbrol Liquid Poly (yes, I know this is a solvent that’s intended for sticking together plastic kits but it’s a great brush cleaner too). Once you’ve painted the base with the varnish put it aside in a dust-free location to dry overnight.

For the matt varnish I use Winsor and Newton acrylic matt varnish. This also needs a really thorough shaking before use. If you do the job properly, you’ll get an excellent flat matt finish – if not, then expect shiny results but these can be corrected with a second properly shaken coat. I sometimes find I need to touch up the bits I missed first time around with a second coat anyway. I dilute my matt varnish with water mixed with a drop of washing up liquid to help it flow better. Again, it’s good to leave this to dry in a dust-free environment but it doesn’t usually need anywhere as long as the gloss varnish before it’s safe to handle. Check the directions on you own preferred varnish for guidance here.

STEP 6: Adding the figure and basing material
When the matt varnish is dry (and assuming that your chosen casualty figure is also painted, varnished and dry) it’s time for some assembly work. I glue the casualty figure to the base using UHU but there are plenty of other adhesives that’ll do the job just as well. Once this is set, you can start adding your basing materials.

Everybody seems to have their own recipe for this so go ahead and do whatever works for you. I thought I’d share my approach though, in case it provides any inspiration. Well, it’s not really mine – I learnt it from the late great Ian Stables.

He used to use ready mixed pre-coloured flexible wood filler. There are all sort of brands of this type of stuff but Ian recommended Wilko dark brown. If you’re in the UK, you can buy this from Wilkinsons (which is a pile it high sell it cheap hardware chain store). The last time I bought a 1Kg tub it cost £1.49 and 1Kg goes a very long way indeed. Don’t try to use it neat from the tub though because it’s too hard to work. Instead, spoon a dollop out into a mixing bowl and dilute to taste with some water and maybe a bit of PVA glue. once you’ve got a consistency you’re happy with you can sculpt it on to your base, taking care to avoid your figure and the numbers printed on the overlay. I use those wooden stirring sticks from posh coffee shops as my sculpting tools.

The great thing about this Wilko wood filler is that it’s a good earth colour already so most of the painting job is done and it has a great texture to dry brush over. I tend to go for a light sandy colour. Lastly you can add anything else you like to spruce up the base – static grass, bits of cat litter for rocks, twigs from the garden for tree trunks etc etc.

Next time, I’ll post a photo of my finished casualty marker base for the second battalion of my Kurmark landwehr infantry.

Posted in Casualty Markers, Paint and Equipment | Tagged: , , , | 1 Comment »

Casualty markers SBS: part one

Posted by Martin on May 28, 2008

It was way back in February that I promised a step-by-step of how I plan to do casualty markers and I’ve finally got round to doing it. Part of the delay has been the usual stuff about life getting in the way but the other part is that I’ve been experimenting with the various ways I might get the numbering on to the bases. I’ve been through a range of candidate solutions including home-made transfers, Letraset and indiviually printed and glued numbers. None of these, for various reasons, have proved satisfactory.

A recent re-organization of the family computers and home wireless network proved to be the trigger for the solution I’ve now settled on. The computer in the study now runs Windows Vista and we have the latest version of Microsoft PowerPoint installed on it. This new version of PowerPoint includes octagons and hexagons in its arsenal of standard shapes, which has made it much easier to design correctly shaped and sized overlays for my casualty bases. You might recall that I have batches of 1.5mm thick 40mm wide laser-cut plywood bases from Litko.

So let’s get stuck into the first few steps then:

STEP 1: Design the overlays
As mentioned, I used Microsoft PowerPoint to design my overlays for octagonal bases (I’ll do hexagonal ones the same way at some point in the future). I’ve managed to create an A4 sheet of 12 overlays (no point in wasting paper) and each overlay has the numbers one through eight around the edges. And because I’m a nice kind sharing person, I’ve uploaded a copy of this overlay sheet for people to use freely if they wish. I don’t mind any personal non-commercial use of these overlays but please note that I have asserted copyright and I won’t be happy if people infringe my rights for commercial gain.

Download 40mm octagonal casualty base overlays. This version of the file is (I hope) backwards compatible with older versions of PowerPoint.

SBS Step #2
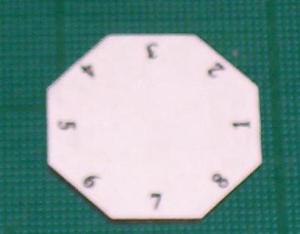
STEP 2: Print and cut out overlay
I’ve printed off a sheet of overlays using my HP DeskJet printer. I reckon any ink jet or laser printer will do the job. Bear in mind that the overlay sheet is designed for A4 sized paper, so if you’ll have to make adjustments if you’re used to US legal sized paper.

Once printed, you can cut out the overlay. I recommend the use of a steel rule and a scalpel to get clean neat straight edges but please take appropriate safety precautions when using sharp tools.

STEP 3: Prepare the base
A quick and simple step but one that’s well worth the effort. Just inspect your chosen base and clean up any rough edges. If, like me, you’re using Litko (or any other brand of) laser-cut bases, you should wipe round the edges with a clean damp cloth to remove any black soot residue left over from the cutting process. You don’t want this black residue to contaminate the overlay and make it dirty.

SBS Step #4STEP 4: Glue the overlay to the base
I use watered down PVA glue for this step. Simply paint a thin film of the diluted glue on the base and slide the overlay into position. Try to keep you hands clean and clear of glue and use a dry towel to pat the overlay firmly down on the base and smooth out any air bubbles (not that I had any problems with these). The idea here is to avoid handling the surface of the overlay as much as possible to minimze the risk of it getting dirty. Now set aside to dry for a couple of hours.

Er… Sorry the photo of the glued overlay is out of focus. I’ll try to replace it with a better picture later.

Once the glue is dry we’ll move on to varnishing and basing up the casualty figure. More detail about these steps later in part two.

Posted in Casualty Markers, Paint and Equipment | Tagged: , , | 2 Comments »