RSS 2.0 feed

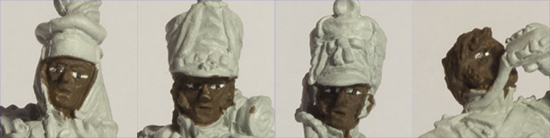
All around views of the completed Marie Louise from the BfK 2012 Limited Edition set.
It’s been a long time since the last posting in this paint-in series and rather than spread things thinly by discussing progress across all four figures, I’ve decided to use this posting to discuss the steps I took to complete the Marie Louse infantry figure in the set. The main reason for doing this is that, after a disrupted Summer, I felt in need of the morale boost of getting least one of the figures over the finishing line – painted, varnished, based – the works!
The last time I wrote a paint-in posting, this chap at least had his head, trousers and shoes completed. When I re-commenced work, the first thing that happened was that I decided I wasn’t completely satisfied with the work I’d previously done on the pokalem, so I did some reworking of the blues to make me happier and to get back into the swing of things. Then I moved on to the greatcoat which I decided to paint brown given the amount of grey and blue across the set as a whole. The basecoat was Vallejo German Camo Black Brown (VMC822), first highlight was Vallejo Flat Brown (VMC984) and the the second highlight was Andrea Medium Brown (NAC-46).
After than, it was on to a lot of details, many of which are unexciting so I’ll simply list the paints as follows:
- White strapping and shako rosette: basecoat – Second Shade (Andrea White Set), first highlight – Base (Andrea White Set), second highlight – Vallejo White (VMC951). For these colours, two thin coats rather than one thicker coat will give a smoother finish.
- Black for cartridge case and shako: basecoat – Vallejo Black (VMC950), first highlight – Vallejo Dark Grey (VMC994), second highlight – Vallejo Neutral Grey (VMC992), third highlight – Vallejo Light Grey (VMC990). Go sparingly with the final highlight.
- Brown for the musket and potatoes (!): basecoat – Vallejo Burnt Umber (VMC941), first highlight – Vallejo Beige Brown (VMC875), second highlight – Vallejo Cork Brown (VMC843).
- Canvas for sack and cloth wrapped round musket lock: basecoat – Vallejo Flat Earth (VMC983), first highlight – Vallejo Ochre Brown (VMC856), second highlight – Vallejo Yellow Ochre (VMC913), third highlight – Vallejo Buff (VMC976), fourth highlight – Vallejo Ivory (VMC918).
- Brown for backpack and leather strap on water bottle: basecoat – Vallejo Burnt Umber (VMC941), first highlight – Vallejo Cavalry Brown (VMC982), second hightlight – Vallejo Red Leather (VMC818). The piping was done with Vallejo Ivory (VMC918).
- Brass for shako plate, “N” on cartridge case and musket bands: Vallejo Gold (VMC996) with several pin washes of Vallejo German Camo Black Brown (VMC822). This is one of the rare occasions that I use washing as a technique and the key is the patience to go for multiple very thin washes rather than one or two more opaque ones.
- Gunmeatal for musket: basecoat – Vallejo Dark Grey (VMC994), first highlight – Vallejo Natural Steel (VMC864).
All the above is pretty regulation stuff. The painting I want to devote some commentary to is the lentille pompom. You can choose different colours according to which fusilier company of a battalion you wish to represent – dark green for the first, sky blue for the second, aurore for the third and violet for the fourth. Normally the lentilles of the first battalion would be solid colour but it was common for those of the other battalions of the regiment to have white centres with the battalion number inscribed on them. For the purposes of the paint-in, I thought it would be instructive for me to tackle the notorious aurore colour because I have seen so many bizarre interpretations of this over the years. Of course, it’s impossible to be prescriptive about this (or any other historical colour) but I took my cue from the meaning of the word – dawn. To my mind that implies that the colour was intended to be the pinky orange of the sky at dawn. With that in mind I used the following paints: base coat – Vallejo Orange Red (VMC910), first highlight – Andrea French Orange (NAC-35), second highlight – Vallejo Sunny Skintone (VMC845).
When you’ve finished all the painting, leave the figure overnight to dry completely before varnishing. There’s a lot written about varnishing and everybody will have a recipe that works for them and gives the desired outcome. I aim for two things: rock solid protection of the paint finish and as matt a finish as possible. With that in mind, I currently follow a three step process, leaving the figure to dry overnight between in each step hidden under a plastic cup to prevent dust and hairs settling on the figure:
First, I paint the figure with Humbrol Enamel Clear Gloss 35 for protection. Second step is to paint with Winsor and Newton Galleria Matt Acrylic Varnish. The reason I do this is not to provide the final matt finish but rather to help me when I apply the final coat of matt varnish which is shiny when wet and I can’t see the spots I’ve missed when painting over the Humbrol gloss finish. The third step is to paint with Revell Enamel Color (sic) Matt 2. For all these products I can’t stress enough the need to follow the manufacturers instructions – especially when it comes to stirring them thoroughly.
Once the final coat of varnish is finished, I now take precautions to avoid handling the figure directly because oils from your fingers will start to add a sheen to the matt finish. So, for the basing steps, I handle figures using a paper towel and then only pick up based figures by their bases (people visiting my house get very dirty looks if they pick up figures by any other method).
For the figures in this set, I promised to sign the bases, so I fortunately remembered to do that before gluing on the figure. The lucky recipients will see the flourish of my initials with the year (2013) in permanent black Sharpie pen on the underside of the base. Having glued the figure to the base and let it set, I built up a thin layer of epoxy putty ( a 50-50 mix of green stuff and Sylmasta A+B putty). When that had set, I applied a diluted coat of PVA glue and dipped the figure in a tray of N-gauge model railway ballast. When dry, I repeated for a second coat of ballast to ensure good coverage and then glued on some individual larger stones. When all the PVA had dried out completely and I was satisfied that there were no loose particles I applied a final light drybrushing of Vallejo Buff (VMC976). And voila, the figure was complete!
Now I’m bracing myself to tackle completion of the second figure. This should be a little more challenging because it’s the drummer with all his Bardin uniform Imperial lace.